When most people think about a roof replacement, they think of shingles or tiles. However, the smaller components of the system—such as flashing and drip edge—play critical roles in keeping a home dry and protected. These materials direct water away from vulnerable areas, such as roof edges, valleys, chimneys, and vent openings. We will explore how flashing and drip edges are installed during a roof replacement and why their correct placement can make or break a roofing project. Even the best roofing materials can’t perform to their full potential without them. Water intrusion caused by missing or poorly installed flashing can lead to rot, mold, or damage far beyond the roof. The drip edge, meanwhile, keeps water flowing into the gutters and prevents it from seeping underneath shingles. These elements may not be flashy, but their importance becomes clear when they’re the last line of defense against the elements.
Why Flashing and Drip Edge Matter More Than You Think?
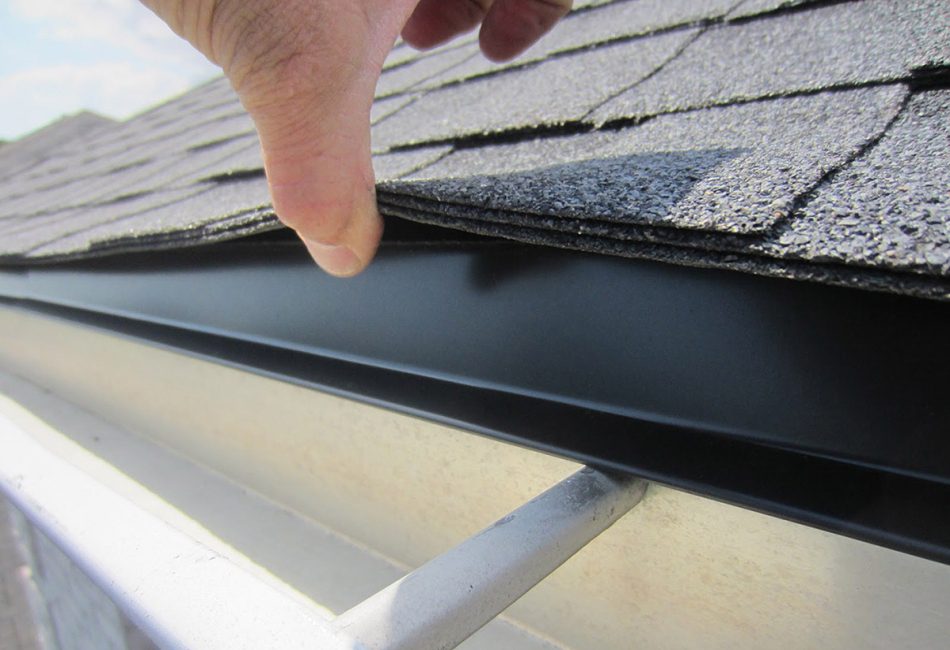
- The First Line of Defense: Installing the Drip Edge
Drip edge is one of the first components installed during a roof replacement. It’s a narrow piece of metal flashing placed along the roof’s eaves and rakes before any underlayment or shingles are applied. Its job is simple but crucial: direct rainwater away from the fascia and into the gutter system. Without a drip edge, water can slip behind the gutters, soaking the fascia board and causing wood to rot over time. During installation, the drip edge is typically nailed directly to the roof decking, overhanging the edge just enough to guide water away efficiently. After this, the underlayment is rolled out and overlaps the drip edge along the eaves, ensuring no water can sneak underneath. On the rakes, however, the drip edge goes over the underlayment. These subtle placement differences are critical for proper drainage. A seasoned roof replacement contractor will know the sequence by heart and ensure the drip edge is aligned precisely to avoid future water damage.
- Protecting Penetrations: How Flashing Shields the Roof
Once the underlayment and drip edge are in place, attention shifts to flashing, which is installed around areas where the roof surface meets vertical elements. Chimneys, skylights, vent pipes, and dormers are all weak points where water can potentially seep through. Flashing consists of thin pieces of aluminum, galvanized steel, or copper that are shaped and fitted tightly against these features. The flashing acts as a barrier, redirecting water away from seams and joints that would otherwise be exposed. Each type of flashing—step flashing, counter flashing, and vent pipe flashing—is used for a specific roof part. Step flashing, for instance, is layered with shingles along vertical walls to guide water downward. Counter flashing is installed over the step flashing to offer additional coverage and protection. Properly installed flashing must integrate with the shingles and the underlying structure, creating a seamless path for water to travel down the roof without penetrating any gaps or cracks.
- Integrating Flashing with Shingles and Roof Valleys
One of the more complex areas for flashing installation is in the roof valleys, where two roof slopes meet. Valleys are high-traffic areas for water runoff, and if not properly flashed, they become prime locations for leaks. Metal valley flashing is laid down before the shingles are installed and is typically wide enough to catch large volumes of water. It’s nailed carefully to avoid piercing spots where water will naturally flow, and sealant is applied at the edges to prevent moisture infiltration. Flashing must also be carefully coordinated with shingle placement to maintain function and visual consistency. Roofers often cut shingles to ensure they fit snugly against valley flashing and other metal elements. This task cannot be rushed, as sloppy installation usually results in long-term problems. Meticulous integration of these elements is key to ensuring the roof performs well under heavy rain, wind, or snow.
- Securing Long-Term Performance with Final Flashing Touches
After installing the shingles, more minor touches complete the protective shell, and major flashing pieces are in place. Around vent pipes, rubber boot flashing is often used, sealed both mechanically and with roofing cement to ensure a watertight finish. Chimneys receive counter flashing embedded into mortar joints for stability and layered over the base flashing to form a tight seal. Skylights may be surrounded by a combination of step and continuous flashing, depending on their design and placement. These final elements are just as essential as the more visible parts of the roof. They lock out wind-driven rain and keep moisture from traveling underneath the shingles. Once all flashing is installed, contractors inspect the roof for any gaps, overlaps, or exposed nail heads that could compromise the system. This thorough approach ensures that the flashing and drip edge will continue to perform long after the rest of the roof has settled.
In the broader picture of a roof replacement, flashing and drip edge may seem like small players. But their role is essential to the integrity and longevity of the roof. These components manage water flow, protect vulnerable areas, and help the roofing system work as one cohesive unit. Incorrect installation or omission of either element can lead to severe damage that may not surface until months—or even years—later. Homeowners planning a roof replacement should take time to understand how these components function and ensure they’re included in the scope of work. A properly installed drip edge will guide water to the right place while flashing protects your home from leaks and unexpected repairs. When done correctly, these materials disappear into the roofline, silently performing their job for years. Yet it’s their quiet, constant protection that makes them indispensable. A successful roofing project isn’t just about what you see—it’s about everything working together to keep the unseen problems away.